“Il Baracchino” is an adult animated series written and directed by Nicolò Cuccì and Salvo Di Paola, with the animation studio Megadrago based in Palermo, Italy.
The series is set in the gritty yet vibrant world of stand-up comedy. The story follows Claudia, an idealistic aspiring art director, in her desperate attempt to save a crumbling, yet legendary comedy club. To revive the venue, she recruits an improbable lineup of tragicomic performers including a chain-smoking pigeon with caustic humor, a “boomer” reincarnation of Leonardo Da Vinci, even the Grim Reaper himself. You can watch the first episode here.
The series, an Amazon Prime Original in Italy produced by Lucky Red and Megadrago, features a stellar cast made up of some of the major Italian stand-up comedians and actors and uniquely blends various animation techniques, from 3D to stop-motion and traditional 2D, creating a surreal and unforgettable visual language.
This article is based on the presentation by Nicolò Cuccì and Andrea Cigognetti from Blender Conference 2025 in Amsterdam.
The Vision: A Mixed-Media Noir Experience
Nicolò: This wasn’t going to be a traditional 3D animated series. We wanted a mixed-media show that blended 3D animation, stop-motion puppetry, and various artistic styles while maintaining a consistent feel throughout. The noir aesthetic was central to our vision: a dark, stylized world where comedy and drama could coexist.
The challenge was: how do you create visual consistency across multiple animation techniques? Our answer was to ground everything in the animation itself. No matter what technique we used (3D, stop motion, or mixed media), the animation principles would remain the same, giving the show a unified visual language.
Rigging and Problem-Solving
When Andrea (head of CG) joined as technical supervisor, he immediately focused on two topics: character rigging, and previz setup. Character rigging required a diversified approach due to the different character designs, while the previz setup was urgently needed as the team basically skipped the traditional storyboarding phase and started working immediately in 2.5D space.
The UV Warp Revolution
Andrea: When it comes to rigging, one of our breakthroughs was the UV Warp modifier. This became the foundation for multiple characters, allowing us to create paper cutout-style animations in 3D space. The most elaborate use was for our Leonardo da Vinci character. We essentially created a 2.5D character using five texture tiles mapped onto simple box geometry. It looked ugly as a raw model, but once everything came together with the UV Warp modifiers and careful driver calibration, the effect was magical.
We spent considerable time with character designer Bart D’angelo testing different poses to achieve that paper cutout feeling. Did we need to make the user interface renaissance-themed for Leonardo’s rig? Absolutely not. But we did it anyway because it was fun, and that joy in the work translated to the screen.
Geometry Nodes for Additional Rigging
For Leonardo’s mouth, we used a curve connected to bones, with the gradient achieved procedurally through geometry nodes. The mouth itself was created entirely through shaders. We even applied the UV Warp method to Leonardo’s props, extending the technique beyond just character animation. This procedural approach saved us countless hours and gave animators intuitive controls.
Claudia: The Main Character Challenge
Most of the R&D budget went into Claudia, our protagonist. Her design is part Olive Oyl from Popeye, part classic animation, with an artistic touch that made her feel like a 2D stop-motion character brought to life in 3D.
We built Claudia’s rig on top of Rigify, using bendy bones for her rubber-hose arms. But the real innovation came with her facial animation system. Thanks to Inês Almeida, we developed a shape key selector inspired by previous work by Vertex Arcade. Animators could pose Claudia’s face intuitively, mixing and matching expressions from the storyboard reference, while still having the ability to tweak individual controls for unique poses.
The result was a hybrid system: shape keys for quick, expressive poses combined with traditional rigging for fine control. This gave our animators the freedom to push Claudia into exaggerated poses that would have been difficult or impossible with either system alone.
Anger Management
Nicolò: One of our most interesting challenges was Claudia’s anger management transformation. The original concept couldn’t be achieved with our standard rig, so we explored alternatives. We initially tried clay motion in Blender, but I wasn’t satisfied with the results. Eventually, Andrea found a solution by mapping the 2D concept art directly onto a mesh.
The rig was surprisingly simple (just two chains) but it gave our animators exactly what they needed. We had to create many anger management moments throughout the series, and this approach made it possible.
Previz and Layout: Building the Foundation
One of the most transformative aspects of our production was switching to a Blender-based storyboard workflow. In the early stages of pre-production, we used to create storyboards on paper, randomly on post-its and printer sheets, but everything changed when we adopted Grease Pencil for previz.
Working with Alessia Lenoci, our story supervisor, we used a system where we could create 3D previews with 2D animated characters drawn in Grease Pencil. This enabled us to do camera movements on 3D sets with 2D drawn characters, and the layout we created was almost identical to the final renders, several months later.
This approach changed how we thought about scriptwriting. The gap between having an idea and seeing it on camera became so small that writing became a much more collaborative experience. The creators, scriptwriters, and artists could all be in touch with the filmmaking process simultaneously.
Our layout process was integral to making our mixed-media approach work. Because we were combining 3D animation with stop-motion puppetry and various other techniques, we needed a robust previz system that could accommodate all these elements in a unified space.
The layout stage was where we established the foundation for each shot. We worked out camera positioning, blocking, and most importantly, lighting intent. This was especially critical for shots that included stop-motion elements like Luca the pigeon. By establishing lighting during layout, we ensured that when the stop-motion animation came in, it would integrate naturally with the 3D characters and environments.
Because everything existed in 3D space within Blender, including our 2D-style card characters and Grease Pencil storyboards, the layout stage gave us an accurate preview of the final result. This meant fewer iterations and more confidence in our creative decisions before committing to final animation and rendering.
Animation Philosophy: Grounded in 2D Principles
Nicolò: We wanted the animation to be the unifying element across all our varied visual styles. We developed a consistent animation language that worked whether you were animating in stop motion, 2D, or 3D in Blender.
Our approach was rooted in 2D animation principles. We focused on strong poses that were grounded and appealing. Everything was staged to face the camera and look good from the intended viewing angle. This 2D-inspired approach worked beautifully in 3D space, especially with Andrea’s character rigs.
The production schedule was intense. At the peak, we were asking animators to deliver 40 seconds per week (sometimes as low as 20, but often at that upper limit). To make this possible, we made a crucial decision: no spline animation. Everything was done in stepped mode with holds, and we gave animators complete agency to choose their timing: twos, threes, fours, whatever worked best for each shot.
Rendering Innovation: Real-Time Compositing
Andrea and I knew from the start we’d use EEVEE for rendering. The decision wasn’t just about speed (though rendering a 4K, six-episode series at 24fps certainly required efficiency). EEVEE excelled at NPR, which was perfect for our mixed-media aesthetic.
We locked ourselves to Blender 3.6 LTS and benefitted from the continuous improvements provided by the Blender development team during our production window.
Andrea: One of our boldest decisions was to eliminate the post-production department entirely. We didn’t have a compositor on staff, and coming from the VFX industry, I was tired of juggling endless layers. Instead, we used “real-time comp”: a workflow where everything, including cards for 2D-style characters, existed in 3D space and rendered together.
This approach had multiple advantages. Characters on cards could be lit consistently with the rest of the scene. We could see our final shots in near-real-time. Luca the pigeon, who was stop-motion animated, could integrate seamlessly with 3D characters because his lighting was established during the layout process.
Creating Atmosphere
We developed several shader tricks to achieve our noir atmosphere. For “studio lighting” effects, we used animated shaders on geometry: simple but effective. By over-scanning the camera, we created glare effects that suggested theatrical top lighting.
We extensively used vignette to emphasize elements, create fake depth, and suggest volumetric lighting. In one shot, we faked a mirror reflection by duplicating the animation output and making it reflective through a projected map in the shader. An empty controlled the projection, giving us convincing reflections without the render cost of actual mirrors.
Mixed Media Integration
Some of our most complex shots combined stop-motion, 3D characters, effects, and crowd simulations all in a single frame. We optimized heavily, rendering multiple characters on the same tile whenever possible.
The series was primarily black and white, which helped maintain our noir aesthetic while also being practical for our pipeline. But we did have one episode in color, achieved through texture and shader work that allowed us to maintain our established workflow while expanding the visual palette.
The Blender Studio Pipeline
When we first started, we had animated only 9 minutes of content in our entire lives. Now we were facing 100 minutes of production. With limited experience and time to build a studio pipeline from scratch, we decided to emulate the Blender Studio pipeline one-to-one. Everything the Blender Studio team had documented on studio.blender.org became the blueprint for our production management process.
Some of the fundamental tools and processes adopted where:
- Kitsu (and the Blender Kitsu add-on) to keep track of all production tasks, from early story reels to final renders.
- Shot builder add-on, used to construct all shots based on info stored on Kitsu.
- Flamenco, for render management of long sequences, and also the final export of the episodes. Making use of our in-house render farm enabled us to re-export entire episodes within a few minutes.
- Subversion (SVN), for version control. While at times challenging for artists from a usability standpoint, this gave us the ability to track changes, collaborate with minimal conflicts, and maintain a stable production environment.
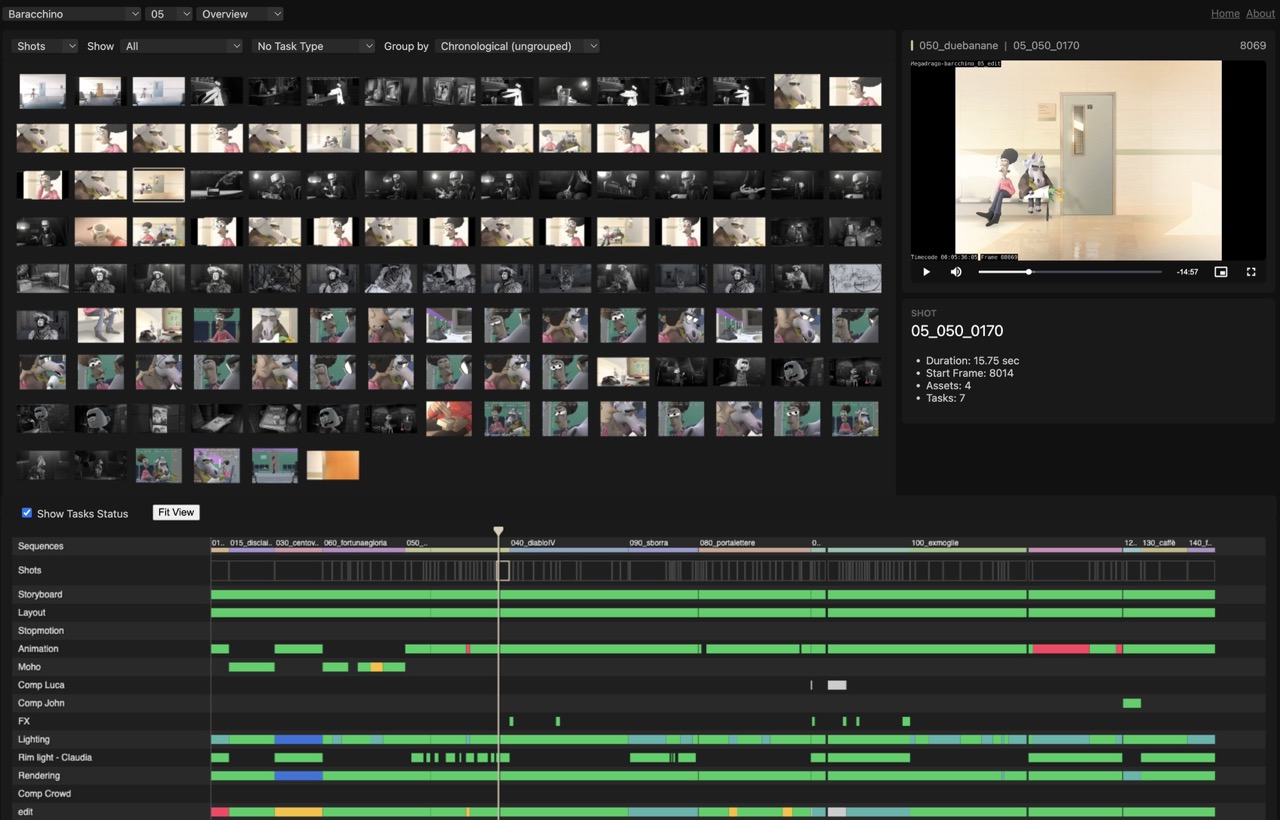
- Watchtower, for intuitively visualizing the advancement of the production.
- Next to that, many other aspects of the Blender Studio Tools where followed, such as the naming conventions, the Blender launcher system, etc.
Editorial-Centric Workflow
Our pipeline revolved around editorial in a constant feedback loop. Everything started with a storyboard, then moved through a back-and-forth with editorial. Same for asset creation and character rigging, which fed into layout and then to editorial.
Effects, lighting, everything operated in this circular pattern, constantly ping-ponging with editorial to maintain the overall vision. We edited the series using primarily Blender’s Video Sequence Editor. This tight integration meant we weren’t exporting and importing between different software packages; everything stayed within the Blender ecosystem.
Building Megadrago: More Than Just a Series
Nicolò: While creating “Il Baracchino” we also ended up building Megadrago, our studio. Our team was small (about 20 people) but every single person contributed ideas that shaped the final show. The team’s collaborative spirit was the best part of this journey. “Il Baracchino” proved that a small Italian studio using open-source tools could create a high-quality animated series for a major streaming platform. We didn’t just make a show; we built a studio, a pipeline, and a team capable of tackling ambitious projects.
We’re incredibly grateful to everyone who worked on “Il Baracchino”, to the Blender Studio team, the Blender developers and to the Blender community that made our production possible. If you’d like to discuss the production in more detail or have questions about our pipeline, find us at megadrago.it.
“Il Baracchino” is streaming now on Amazon Prime Video. The series was produced by Megadrago Studio using Blender 3.6 LTS.